A View for all Reasons - Part Two
Written and published May 27, 1999
Last week I introduced the various views we Mac users get to choose from and told you that this week we'll continue to look at the other options in the View Options dialog box. This week the focus is on the list view and its options.
When you want a lot of information about your files - and want it at a glance, list view may be your most efficient choice. (I say "may" because if you're on a server, list may not be a viable option. If you take a look at William Cerniuk's note.") We'll look at some ways you can use list views to provide what you need when you need it. But first, let's look at how to change the info.
Setting List View Info
 To set up the look of a window: To set up the look of a window:
- Open the window
- If the window is not already showing its contents as a list, choose View->as List.
- Choose View->View Options, to opens the View Options dialog box.
- Make your viewing selections. Click any unchecked option to turn it on, and click already checked options to turn them off.
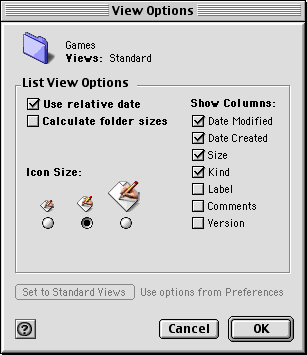
Notice that in the View Options you first see the name of the folder you're working in. Then it says Views: Standard, or Views: Custom.
Standard means you are currently seeing your default view stuff. You can change your default by choosing Edit->Preferences. Minimizing your default List View may speed up your Mac.
Custom means you've made changes.
With List Views less is more. Fewer columns equal more speed. For every column of information you request from the Finder, the Finder has to do more work. With that in mind, here are your options:
- Use relative date lets the dates say Today or Yesterday instead of listing the generic date. It's a nice perspective. (I'm not sure of the speed hit for this.)
- Calculate folder sizes calculates and reports the size of the folder by tallying up all the stuff inside it. This can take some time. Most people skip this option and do a quick File->Get Info for that instead. If you need to see several folder's sizes you may want to turn it on, then turn it off later.
- Icon Size was discussed last week. It controls the size of the file and folder icons.
- Date Modified shows you the date and time you last changed a file. If you're viewing a folder within the list of that window you'll see the date of the last changed file within that folder. I am not sure how much of a speed hit dates are.
- Date Created is like Date Modified, but shows the date the item was first saved.
- Size is the size of a file, not the calculated size of a folder.
- Kind tells you whether a file is a folder, application program, or documents. With a document you also learn the name of the program that document belongs to - if that program is installed on your Mac.
- Label shows you the label you have assigned any file or folder - if you've assigned any. If you use labels this can be very helpful (unless you're familiar with their associated colors and know the label that way).
- Comments show you any comments you may have entered within the Get Info box. It's a long line of info. Most people skip this and use File->Get Info instead. However, if you're sharing info with people and want them to know there are Comments, this can be a good thing to show.
- Version tells you the version of an application. (More on this later.)
After you set up the info you'll see within a folder and close the dialog box, you can move the columns around and even resize them. As you make a column smaller, the font first becomes narrower, then the info begins to abbreviate. Try making a date column smaller and larger. Notice how the date info changes intelligently. You can even choose the font you see.
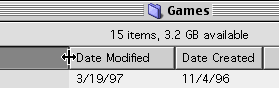
To change a column's width move your mouse over the column's border unitl the pointer turns into bi-directional arrow, as in this screen shot. Then click and drag.
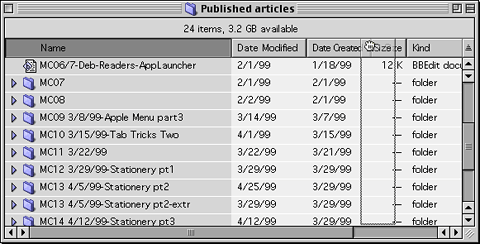 To move a column just click and drag the column header for the column you wish to move,. As you begin to drag it your mouse turns into a grabbing hand and dotted lines appear to show you where the column will land when you release the mouse. To move a column just click and drag the column header for the column you wish to move,. As you begin to drag it your mouse turns into a grabbing hand and dotted lines appear to show you where the column will land when you release the mouse.
With List Views less is more. Fewer columns equal more speed. For every column of information you request from the Finder, the Finder has to do more work.
To Each His Own
When using List View for a window, all folders you view from within that window provide the same information. Try this to see for yourself:
- Open a folder and set it to View@as List. (This needs to be a folder that has other folders inside it. For example your Apps folder.)
- Now click the arrow next to a folder within that window to reveal the inner folder's contents. Notice that the info you see in the revealed folder matches its parent window.
- Next double-click to open that inner folder and set its own custom views. (Go to View@ View Options and change the visible columns or try moving some columns around.) Now close that folder.
- Use the arrow to reveal its contents again and notice what the columns look like, then double-click that folder again and notice that when it is opened as its own window it has its own custom view.
Having individual window view settings gives you a lot of flexibility as you'll see more and more from now on as you use your Mac. There are lots ways you can use this ability...
Oops... cliffhanger. We'll look at some of those ways next week. (It's a good thing this isn't television or you'd have to wait until next season.)
In Our Next Episode... er... Next week
Next week I'll show you some of the ways to take advantage of list views. But by then you'll probably have customized all of your own folder views and figured out tons of view combos and advantages on your own.
|