|
||||
Pop-up Tab LaunchersWritten and published February 2, 1999 By now your hard drive window is clean and you have one easy way to launch your programs. This week we'll talk about another. Remember that second "Apps" folder full of aliases? It's been hanging around long enough. It's about to become a second launcher - and I'll talk about its benefits. Launcher method number two is... (imagine a drum roll please)... a pop-up tab. If you're new to pop-up tabs this will also be a good introduction to them. Once you know about pop-up folders you may see lots of uses for them, as I do.
To set up your pop-up launcher, open the "Apps" folder. It has to be open because folders only become tabs when they are open. Once it's open, click on the stripes in the title bar and drag the folder down to the bottom of your screen until it turns into a tab. You can see a line-up of tabs in the accompanying screen shot. An outline of the folder will show you when you're successful. Once a folder appears as a tab, you can move it into place anywhere along the bottom at any time just by dragging the tab. (If using 8.5 don't click on the icon of the folder as that performs a different function.) (BTW: in 8.5 you can also click the edge of any window to drag the window.) What tabs do
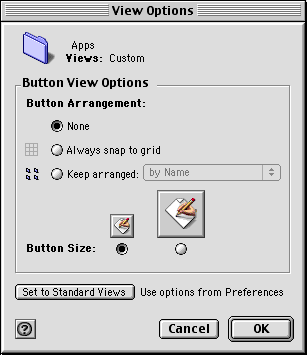
You can set the icons in a tabbed folder the same way as in a regular folder. Normally you open the window to set a view; now you click on the tab to pop it up. While the folder is up (which equals being the active folder) go to the Views menu and select the desired view. In a regular window, unless it's for kids, I recommend setting the view to as List. That's because in List view it is handy to click the arrow to reveal the contents of a folder. However, since the folder we are tabbing is to be used as launcher and only contains Applications, not folders, viewing as Buttons makes it a bit more handy for launching. That is because when viewed as an button, to launch an application or file (or to open a folder) you just click once instead of double-clicking. Besides, buttons look kinda cool and this gives you a chance to see them once in a while. To set up your launcher tab, click on the tab. With the tab popped-up, select View->As Buttons. Then select Views->View Options. In options, choose the smaller button size. You can explore the rest of the view options later on, but for now, just have your options match the image here. Now that you have a tab full of small buttons you can organize them. If you click on a button you launch the program, so to move a button click on the button's name, then drag it. Launching programs from a tabNow, any time you want to launch a program you can move your mouse over the tab so the folder pops up, then click once on the application. So far, this is not much different from the Apps folder in the Apple menu. But there are two benefits to the pop-up. One is drag and drop. Say you saved a document as SimpleText but it's too large to open in SimpleText, or you want to format it with tables so you want to turn it into a Word 98 document. The easiest way to do so, is to drag the SimpleText document onto the Word icon to have Word open and convert the file. And with this launcher you happen to have a Word button waiting to pop into action. (If, when you drag a file onto any application, the app icon darkens, that file can be drop-converted.) The second benefit of the pop-up folder is that pop-ups still work when you start with Extensions off. Unfortunately, with Extensions off, the submenus in the Apple menu don't function. That makes the Apple menu less convenient. It still works, but you have to go to the Apple menu and drag to the Apps folder, which opens the folder. Then you can double-click on a program's icon to launch a program. The pop-up, however, still works any time. Drag and drop also works with Extensions off, by the way. Other tabsAfter you set up your Apps folder as a tab, you can also do the same for the extra Utilities, Games and other folders if you'd like. You don't really need to create a tab folder for Utilities and Games as you won't be drag and drop file converting to those programs. But you might want to tab them just to see if you find them handy. Tabs come in handy for more than just launchers. I tab any folder that contains a project I am actively working on. Notice the MacCentral tab in my screen shot. It contains my columns, your letters, research, and the million dollar contract I signed to do this column. Next is my ComputerUser newspaper column folder, and is a book folder. The column folders stay tabbed. Other folders get tabbed only while I am working on a project. By having the folder tabbed, I can easily access the folder's contents. I can also save to those folders very easily because they are open and in view so thanks to Action files I can click the tab and switch to it in my Open/Save dialog box. (I believe if you are using Default folder you can do the same, and if Click, There it is still works you have the same benefit with that.) Realistic implementations
If you have just a few applications, don't bother with having two Apps folders full of aliases as the second it redundant. (Now's the time to yell, "Now she tells me! After I made that whole folder full of aliases!") If you just have a few apps un-tab that folder I just had you tab. (You can trash it.) Then go to the Apple menu, drag to the Apps folder and release the mouse. Now that this folder full of aliases is an open window, make it a tab. Whenever you change this folder's contents it'll be reflected in both locations. Since I have tons of programs and don't need easy access to most of them, I don't want my Apple menu folder full of apps to be tabbed. But I do need drag and drop access to a few programs. I also don't need access to every Utility, but do need some. My solution is a folder I happen to call "Drag" (cause I like short names). In that folder I keep second aliases to the programs I drag to. Then I add aliases to the utilities I drag to often. Those utilities include DropStuff, StuffIt Expander, Shrinkwrap, ZipIt, DropScan (Virex), JPEGViewer, and two Font Reserve drag apps. If you want to do this, simply change the name of the second alias-filled folder you made the first weeks. Call it Drag or something short and descriptive. Then remove the aliases for the programs to which you don't need to drag and drop. If you made a second Utility alias folder move in the utilities to which you want to drag and drop. (Then toss that extra folder.) Finally, tab that drag and drop folder. Disappearing TabsThe tabs are not always visible so don't let that throw you off. When using Office 98, which puts a Status Bar at the bottom of the page, you won't see the tabs. Just click off of the document, on the desktop to have the Tabs, a Finder element, come back into view. If this happens to you in another program, do the same: click on the desktop or make the Finder active again. Making things look nicerIt's always nice to be neat. Last week many of you wrote and asked me how I made the divider line in my Apple menu. This week you'll be wondering about sizing tabs. So in my next column I will give you those secrets. (I was going to do the divider this time but this is too long.) You read my mindA few of you also wrote about this very method even as I was writing this. Here are three examples.
|
||||
|
|
|
• • • Next Column
|
||
 After this quick overview of how tabs work, I'll suggest a way for your launcher tab. Tabbed folders automatically pop up to reveal the folder's contents whenever you click on the tab. As soon as you move your mouse away from the popped-up area the folder moves out of your way, collapsing down to tab form again. While in the popped-up state, tabbed folders reveal their contents in the same form as any regular folder. The slanted lines on the top left and right grow the window taller or wider to reveal more information, or make the window shorter or narrower. Views can be set just as with all folders. Any open folder can be tabbed. To remove a folder from tabbed state, just drag it up into the center of your screen.
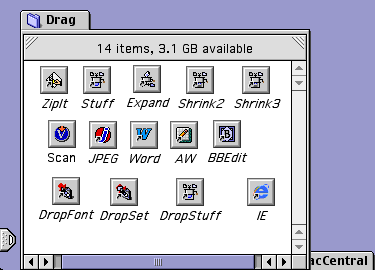 There are many folders you may want to tab but tabs take up room onscreen. The Apple menu is more out of the way. Also, if your folder is full, you may have to scroll within the tab when it pops up.