


Customizing Your Folder's Icons
It's much, much easier to notice a folder if you can easily identify it. So in this column I'll show you how to customize your folder with icons of your own choosing. And next time I'll show you some tricks to make even easier to see or get to those folders.
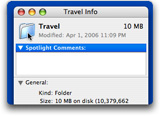
The process is actually simple. You copy a graphic, then you paste it onto the folder via the folder's Get Info window. Now, to look at this in detail....
Putting your photos or graphics onto a folder
Do you have a folder full of things about your child? A folder of your own data? A folder of your mom's stories and email? Maybe you own a house somewhere and have a folder of stuff about that house. Or you have a lot of clients and each has a company logo.
What better way to easily recognize that folder than to put an image of that person, place, or logo on it? There are basically two steps, copy and paste, but the copy part depends on your image source. I'll show you a few solutions.
Tip: Although a folder appears to be rectangular, its image area is actually square, so select a square area if you can. If your content requires a rectangular area, that's fine too because the image will fill the area proportionately.
1) Copy the desired image.
If the photo you like is filed in a folder, rather than iPhoto...
Do this:
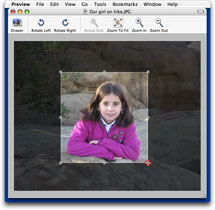
a) Double-click the photo to view it in Preview and click Actual size or set it to a size where it looks good and the pixels aren't showing as stair-steps. (I'm not certain, but it seems the result is better when copied at actual size.)

Tip:
Pressing the Shift key constrains selections or items in the MacOS. You can pretty much count on this whenever you're making a selection within an image, as well as when you're drawing with graphics tools. (That's how you get a perfect circle in drawing too.)
(Release the mouse and Shift at the end.)
(Optional) To adjust the selection, move your mouse over the selected area so the cursor becomes a hand, then click and drag the selected area.
You can drag any handle to alter your selection. However, you'll lose your square if you drag the sides, or if you drag the corner without pressing Shift while you drag that corner.
f) Now move to step two.
Note: When you're all done with step 2, return and close the image window in Preview without saving. You can close it now if you'd like, but by keeping it open, you don't have to come back and do it all over again if you lose your copied content before you're done or if you want to tweak your selection.

If your photo is in iPhoto...
Do this:
a) Locate that photo and click the Edit button.
b) (Optional) If you want your selection to be a perfect square, choose Square from the Constrain pop-up menu below the image.
c) Move your mouse to one corner of your desired image area, press the mouse button and drag to select the desired area, then release the mouse button.
Here, I dragged from the top left corner to the lower right corner, then released. You can then move the mouse to any side and drag to adjust the selection.
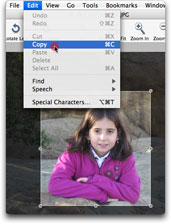
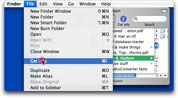
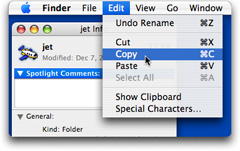
d) Once the image area is selected, choose Edit->Copy, as shown to the right.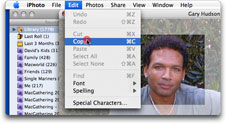
e) Now move to step two.
Note: When you're all done with step 2, return to iPhoto and click Done in the edit window. As you have not done anything to alter your image, you're not saving any changes. You can actually close it now, but by keeping it open. you don't have to do the selection all over again if you lose your copied content before you're done or if you want to tweak your selection.
There are other ways to select an image:
- Use the selection tool for whatever application you're in.
- In an image where you don't see a selection tool, you can try the Mac's built-in selection method: Press Shift-Option-4 key at the same time. This turns the cursor into a cross-hair. Then drag the cross-hair over the desired area of the image. This creates a Picture file on your Desktop. Double-click the Picture file so it opens in Preview. Choose Edit->Copy.
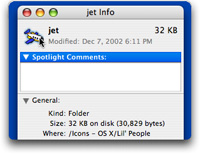
Now that your image is in the Mac's Clipboard, waiting to be pasted, it's time to paste your selected icon into the desired folder.
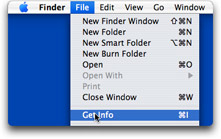
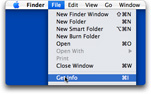
To do this:
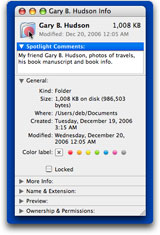
(Or the Command-i keyboard shortcut.)
(Or click the Info icon if you've added that to your Toolbar.)
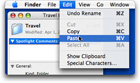
This selects that icon, as you can see by the highlight that appears around it.
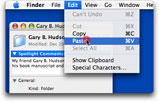
choose Edit->Paste.
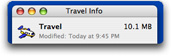
When you release the mouse, your new icon will appear on the folder, like this.
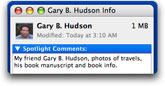
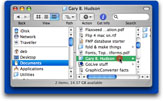
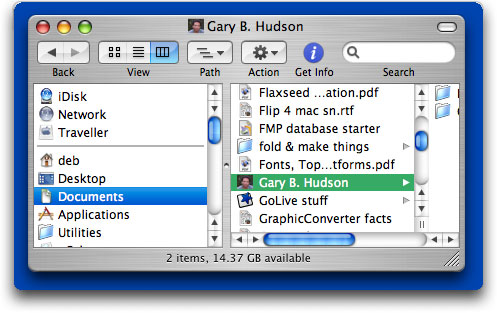
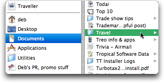
Here's the result of my customized Gary B. Hudson folder in column view. Notice, too, that when this folder is selected, the custom icon, the photo, shows in the window's title bar.
(In case you're wondering, my GoLive stuff folder shown here also has a custom icon.)
Using a Supplied Custom Folder Icon
If you don't have a specific photo or graphic to put on a folder or you'd like something fancier, there are many great folder icons by professional graphic artists, and many share them with us — for our personal use — for free. You may be very surprised by how many icons there are and by their diversity. There's something for everyone. (Really: robots, butterflies, parrots, chairs, cartoon characters, underwear, cars, foods, makeup, and yes, Mac stuff...)
Where to Get Fun Icons
Each offers an assortment of icons you may use for your personal Mac customizing
- InterfaceLIFT.com — A huge collection of freeware icons by many icon designers. This site has the best search engine, which is very helpful. This is where many of my all-time favorite icons live; icons that are of Mac models, hard drive icons, folder icons, etc. (I love a lot of work by Mikkel Madsen.)
- Yellowicon.com — A smaller searchable collection of freeware icons. There are 44 pages of icons to browse. I include this here because I have liked this art director's icons. Ironically, my favorite of his (Penguins) is at InterfaceLIFT, but not found here.
- Pixelgirl Presents — A collection of icons by independent icon designers. You want the Icons (Mac) link. Also check out the Icon Battles pages. No search ability, though, so you have to go through all icons page by page at each visit.
- Iconfactory.com — Click Freeware at the top, then Icon at the right: Iconfactory: Freeware: Icon
Icon Factory has been creating beautiful icons for years. .
My advice: Downloads are disk images, .dmg files, each called download.dmg. Skip these icons until you know what to do with .dmg files. I will have an article about .dmg here soon, and you can also learn about them in a free TeachMac module that I'll add a direct link to soon.
Also recommended by reader Elaine as sites she checks regularly for new icons:
The process is quite simple and logical. You simply copy the icon, then paste it.
Seeing Icons After You Download Them
Zipped (.zip) files are the easiest to deal with as zip ability is built into OSX. Just double-click to unarchive the file and see the folder of icons.
StuffIt (.sit) files are decompressed just by double-clicking on the .sit file — if you have StuffIt Expander installed. Try. If it expands you'll have a folder beside the .sit file. That's the folder that you'll double-click to see your new icon choices.
If you get a dialog instead, you can get StuffIt Expander here via Apple.com for free. After you download and install it, you'll be able to unstuff the icon folders.
BinHexed StuffIt files (.sit.hqx) files are first compressed, then bin hexed. The first time you double-click the file, you'll receive a .sit file. Double-click again, as above. (You'll need StuffIt Expander.)
Disk Images (.dmg files) are files that when double-clicked, act like a disk that's been mounted on your Desktop. That is, the Mac will think you have a disk inserted. You can work with those icons but they'll go away when you dismount the virtual disk, unless you copy that folder to your hard drive. (I'll be writing more about this later on.)
1) Choose an image.
Download interesting icon sets, unstuff or decompress them, then look into their folders while the folder is set to the view you typically use. This is important because a icon may look great when viewed as an icon but is set to look different when it's viewed in List or Column view. Or it may just be too small to recognize in a list view.
2) Copy the image.
To do this:
That icon is actually on a folder so you're really selecting the folder that already has that icon on it.
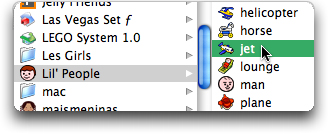
(This icon is part of Lil People Icons by Bob Flynn.)
(Or the Command-i keyboard shortcut.)
(Or click the Info icon if you've added that to your Toolbar.)
This selects that icon as you can see by the highlight that appears around it.
(My highlight color is blue so you see a blue blurry line around the selected icon.)
3) Paste the copied image.
Now that your icon is in the Mac's Clipboard, waiting to be pasted, it's time to paste it into the desired folder.
To do this:
 If you double-click instead, close the folder and try again.
(Or Command-i)
(Or the Info icon if in your Toolbar.)
The highlight tells you it's selected.
Release the mouse and your new icon appears.
 From now on, your folder will have this icon instead of the standard folder icon.
Here's the result of my customized folder.
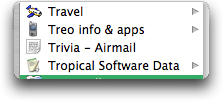
Oh, do you notice other custom folders? I took a screen shot from the About Box of TopXNotes iPod to make that app's data folder more fun. And for my folder full of info about my Treo 700, I used the Treo icon by "MacCool."
Ideas
I f you like saving files to your Desktop while you're working with them (filing them a bit later), you may like the File icon in the Somatic Icons collection by David Lanham, available at Pixelgirl and at Icon Factory here too.
It's always helpful to give your Utilities folder something that says "utility" to you. Consider a tool from a set like Hand Tools by Walid Hassan or a red cross icon such as the fun one in Penguin Icons by Everaldo Coelho.
Not being a fan of that steel hardware look of the MacOS hard drive icon, I like to soften that one up. There are alternate hard drive icons and many great icons of the various Mac models to use there. You can select the icon in the Sidebar to do the Get Info and customize it.
Files too!
Oh, by the way, this customization is not limited to folders. You can actually customize any document's icon the same way, via the file's Info window.
Creating your own icons
If you want to get into building your own icons, look at Icon Builder, a filter for use with Photoshop or Fireworks that makes creating icons for either the Macintosh or Windows operating systems a snap.
PS: If you like this article and want more, please sign up to receive a simple email each time I publish a new piece. It's easy.
Thanks to...
iShowU, SeeFile and the MacCast podcast
for sponsoring this article.